Configure a Challenge: Multi-question Survey
The Multi-question Survey Challenge Type lets you define a survey or questionnaire comprising one or more questions. The platform will reward a Member if they complete the survey.
This article assumes that you have already created the Challenge by either copying a Challenge, or by creating a new Challenge from scratch. See Create a Challenge for more information.
The Definition tab of the Challenge Details screen is used to configure the properties and details of this Challenge. The tab includes several sections, each of which is described below.
Challenge Details Section
Within the header area of the screen, you can configure the following properties of the Challenge:
-
Thumbnail Image: Click Upload to browse to an image file on your local PC. Select the desired image, then click Open. Please note that the thumbnail image is not used within the Challenge content that gets configured on the Content Editor.
The Challenge Details section contains many high-level properties about the Challenge:
-
Display Name: Enter the name of the Challenge as displayed throughout the platform. When copying a Challenge, this value will automatically be the name of the Challenge followed by an incremental counter, such as “(1).” This field supports the use of localized content.
-
Description: Optionally enter a description of the Challenge. This field supports the use of localized content.
-
Type: If you copied a Challenge, this field is automatically populated with the Challenge Type of the base Challenge; you may optionally select a different option. If you change the Challenge Type, the configuration properties displayed on the Challenge Details screen will update accordingly.
-
Prize: If this Challenge rewards a Member with Metrics, enter the number of Metrics in the Prize field, then select a Metric. Optionally check Auto Approve if you want the Metrics to be awarded automatically without requiring manual approval. Note that you can define other types of Prizes from the Advanced Options tab.
-
Categories: Challenge Categories are used to organize Challenges, often for controlling what Challenges get displayed on your website or app. Optionally, to assign this Challenge to one or more Categories, select them from the Categories drop-down menu. For more information, see Getting Started with Challenge Categories.
-
Tag: Tags are used to help organize objects within the platform. Challenges can be searched by Tag from the Challenges screen. To reuse an existing Tag, begin typing all or part of the Tag name, and select it. You can also type in a new Tag value.
-
Rank: Optionally, enter a ranking for this Challenge. This value is used only when sorting the Challenges screen by Rank.
The following fields are available by clicking the Show More link at the bottom of the Challenge Details section.
-
Internal Name: This field is automatically populated based on the Display Name value. This field is disabled by default. To edit the Internal Name, click the lock icon to make the field editable. A confirmation dialog box is displayed; click OK. The Internal Name must be unique and can not include any special characters or spaces; only numbers, letters, and underscores are allowed.
Note: The recommended best practice is to change the Internal Name when you initially copy an Challenge, in order to avoid issues with duplicate Internal Name values. After this initial change, you should not edit the Internal Name again. Never edit the Internal Name after you publish the Challenge.
-
Tracking Code: Optionally, specify a value to track clicks to a Challenge when you share the Challenge’s URL on external channels such as email or Facebook. The platform adds this Tracking Code value to the Challenge URL. Please note that the Tracking Code is not used for tracking Members logged into your loyalty program app.
Definition for Multi-Question Survey Section
This section is displayed only if the Challenge type is Multi-Question Survey. This section is used to define the content of the survey.
To define the survey:
-
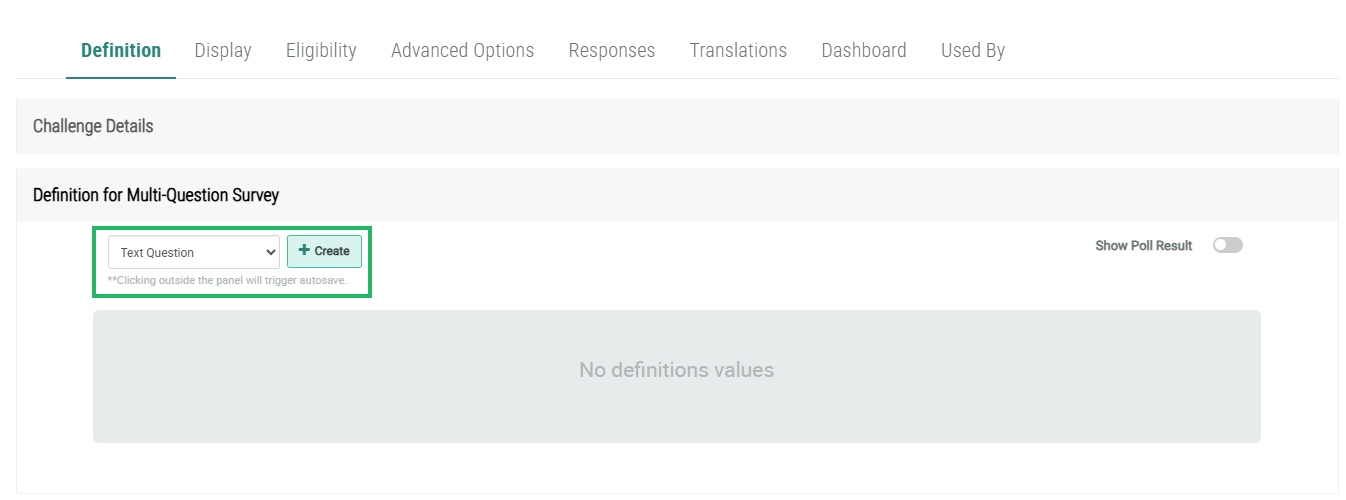
Within the Definition for Multi-Question Survey section, select a question type: Text, Rating, or Multiple Choice (see below for more details).
-
Click Create. The platform generates a preview of the survey question.
-
Configure the question details as described below, depending on the question type.
 Text
Text
To define a simple Text question:
-
In the Question field, enter the text of the survey question.
-
Optionally, in the Description field, enter additional descriptive text.
-
Optionally, you can capture and store the Member's answer within a Member Attribute or Preference (referred to as "binding"). From the Bind drop-down menu, select the desired Member Attribute or Preference.
-
Optionally, to select an image for this question, click the Image icon. Browse to and select the desired image file on your PC, then click Open.
-
If this question is required to complete the survey, toggle Required to Answer to Yes.
-
Click Save.
Rating
A Rating question lets you prompt the Member to rate something using a scale starting at either 0 or 1, up to a maximum of 10.
-
In the Question field, enter the text of the survey question.
-
Optionally, in the Description field, enter additional descriptive text.
-
Optionally, you can capture and store the Member's answer within a Member Attribute or Preference (referred to as "binding"). From the Bind drop-down menu, select the desired Member Attribute or Preference.
-
From the first drop-down menu (red down-arrow), select the lowest value in the rating range (0 or 1). Enter a text label for this lowest value (the default label is "Poor").
-
From the second drop-down menu (green up-arrow), select the highest value in the rating range (2 to 10). Enter a text label for this highest value (the default label is "Excellent").
-
Optionally, to select an image for this question, click the Image icon. Browse to and select the desired image file on your PC, then click Open.
-
If this question is required to complete the survey, toggle Required to Answer to Yes.
-
Click Save.
Multiple Choice
A Multiple Choice question lets you display a question with one or more possible answers.
-
In the Question field, enter the text of the survey question.
-
Optionally, in the Description field, enter additional descriptive text
-
Optionally, you can capture and store the Member's answer within a Member Attribute or Preference (referred to as "binding"). From the Bind drop-down menu, select the desired Member Attribute or Preference. If the selected Attribute or Preference contains a domain of valid values, those values are automatically displayed as the list of valid answers.
Note: If you have the localization feature enabled in your Loyalty account, this list of valid answers will be automatically copied into each locale, which can then be edited with the proper translated values. You can also manually enter the list of valid answers, as described below.
-
To manually enter a valid answer, click the Add Option link, and enter the first possible answer. Optionally, to select an image for this answer, click the Image icon next to the answer. Browse to and select the desired image file, then click Open. Repeat this step as needed to define additional answers.
-
Optionally, to remove an answer, click the Remove icon next to it.
-
Optionally, click the Add Other link to add a catch-all option, where Members can type in an answer.
-
The answers can be displayed as check boxes (the Member can pick multiple answers) or radio buttons (the Member must pick one answer). From the Answer Type drop-down menu, select either Radio Buttons or Check Boxes. If you select Check Boxes, optionally define a maximum number of selected items by entering a value in the Limit Answer field.
-
Optionally, to randomly shuffle the order in which the answers are presented, toggle Shuffle Options to Yes.
-
Optionally, to select an image for this question, click the Image icon. Browse to and select the desired image file on your PC, then click Open.
-
If this question is required to complete the survey, toggle Required to Answer to Yes.
-
Click Save.
-
Repeat the above steps as needed to add additional questions to the survey.
-
Optionally, to delete a question, click the Delete icon in the top-right corner of the question area.
-
Optionally, to rearrange the sequence of questions, click the "handle" area in the top-left corner of the question area. Drag-and-drop the question into its desired position.
Effectivity Periods Section
Challenges are governed by an overall Effectivity Period that controls when, and for long, the Challenge is visible to Members on your website or app.
In addition to the overall Effectivity Period for the Challenge, the platform allows you to set more granular schedules that control when a Member can respond to the Challenge (called the Response Period). Note that Challenges do not utilize the Usage Period.
See Define Challenge Operational Ranges for more information.